
 Here I used the same overall technique for these two but wanted them to coordinate since I'd be donating them to a local Senior Center for their Christmas fair. I started experimenting with design. This is a fun way to learn about color and proportion because the projects are small and don't involve a great investment of time or fiber.For instance, I decided that the contrasting yellow is more effective when placed closer together as opposed to alternating.There's still room for improvement- particularly, the hanging loops- but I was satisfied enough with these to donate them. The others will reside in my kitchen where my poor tired 30-year old potholders will be retired.

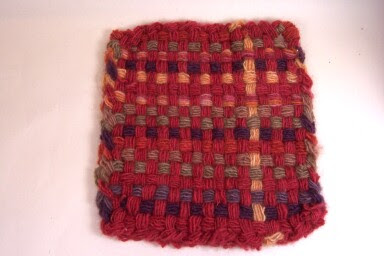 With the fourth and fifth potholders I started getting a little smarter. I decided to make my own "loopers" by wrapping strands of my wool yarn from one peg to the opposite peg four times and then tying off with a square knot. I found it easiest to do this on pegs that were near the corners as there is more space for fingers there.Then I removed the looper and placed it on the loom where needed. So I created loopers as I wove, designing the color patterns along the way. I kept the knots in the middle of the fabric instead of the edges and used a crochet hook to work them into the weave; this helped keep the edges neater.The number of passes around the pegs in creating each looper really depends on the thickness and "squishiness" of the yarn and it's a trial-and-error process. I wanted my loopers, once they had taken a trip through the washer with hot water, detergent and a full wash cycle, then tumble-dried at the hottest setting, to "full" nicely; in other words, I wanted the yarn to fluff out into the spaces between loopers and to also be thick enough to be safe when handling hot items in the kitchen.At this point it takes me about an hour to make each potholder. I'm slow at everything I do so it could take less time for manly people. It's very enjoyable to do while watching football games, etc.More later!
 Back after an extremely long break. I've been focusing on other areas of my life over the past few months, starting a small part-time business within my nursing career and also re-thinking what direction I want to take my fiber business in. More about that later... for now I want to start sharing some of the work I've been doing.I recently bought a potholder loom from Jennifer at CraftSanity. I'm a longtime listener to her Podcasts and have learned so much from them. She interviews various artists, many of them textile artists, in depth, asking many probing questions to help the listener understand how the artist evolved to her present level.Back to the loom! Jennifer has started producing beautiful, meticulously-worked wooden looms in various sizes. The concept is similar to the old potholder looms we used as children; it is so much nicer using equipment like this! Loom dimensions available run from coaster size up to place mat size. Jennifer mentioned a loom large enough for producing small rugs but I haven't seen one yet. I purchased the large potholder size because I wanted to make wool potholders that could go in the washing machine so I needed to plan on shrinkage. That size is working very well for me. I think that the prices of these looms are quite reasonable for the quality of the workmanship; if you'd like a look, head over to her Etsy Shop.
The photo above shows the large potholder loom with my first potholders. On one on the left was made from loopers that I cut from old tee shirts. OK, quite similar to the ones children produce, but too bulky to be functional and I didn't care for the somewhat sloppy edges. On the lower right I tried some three and four ply yarn that I had put together from hand-dyed wool singles spun from local sheep. The colors are nice and it's a pretty cloth, but again not functional because even after a trip through the washer the fabric is too thin with too much open space to use safely. I can't remember exactly how I made the third one (upper right), but it involved using multiple strands of single ply, same yarn. Getting closer to my desired effect but still too thin. I'll be back later with more.


