Thursday, December 29, 2011

Boot Toppers With Meadow Muffins Yarn

I'm not much of a knitter.  I knit far too slowly and make many mistakes.  Worst of all, activities that require my fingers to act as levers repeatedly cause much discomfort.  I need to preserve my hands for the necessary activities so needle knitting is out.

I like to wear footless tights or leggings over fairly thin socks.  The thin socks fit well in my shoes and are easily-replaced when they wear out. The leggings are so cozy with a dress or skirt.  But something nice and bulky and hand-knit was needed between the socks and the leggings.  Here's what I came up with:


Boot Topper on Knifty Knitter Loom with Meadow Muffins yarn


This is my first go-round with using a round knitting loom.  I used a blue (24 pegs) and worked with three strands of Meadow Muffins yarn, working stripes of approximately one inch.  No fancy stitch work... I just followed the directions that came with the knitting loom.

Boot Toppers on Knifty Knitter Loom: Close-up


Here's a close-up of the work.  It shows that each stripe was actually made up of three closely-related colors.  I used eight stripe colors, repeating once.  Each boot topper used two ounces.


Boot Toppers from Meadow Muffins yarn


 I really enjoyed using a circular knitting loom and plan to make more Boot Toppers.  Next: I'll try working with two strands, one a constant color and the other will change as I knit.  I will also use a different, more elastic method for binding off as using the bind-off directions that came with the loom resulted in a lower opening that I could just barely get my foot through.

Saturday, November 26, 2011

Plant-Dyeing All Summer and Fall

Japanese Indigo, Late Summer


 Here I am trying to catch up again.  This will be a whirlwind look at what has been happening with Sojourner Design since my last post.

The Japanese Indigo did splendidly this summer; as I recall, I harvested four times.  I dried some of the leaves; supposedly one can ferment dried Japanese Indigo leaves, thus spreading out some of the indigo dyeing activity into the colder months.  We shall see.

Fibers dipped in Japanese Indigo vat


I was pleased with my dyeing results with the Japanese Indigo although I'd like to have gotten more color from the dyebath and I found it difficult to find days when I could set aside the time to harvest and then immediately dye with the plant.

I also didn't succeed in harvesting seeds for next year.  The plants flowered like crazy (see the tiny pink blooms, lower left, in the photo).  Our weather was so wet and crazy this fall that I never detected what I thought were seeds.  I'll plant more next year but have also bought woad seeds to try.  Woad plants were used for centuries in Europe to obtain blue color.


Pokeweed Closeup; This bract isn't ready to pick


Pokeweed was FUN!  During the early part of the summer I scoped out where there were accessible pokeweed bushes, then the rest of the summer I checked them regularly to be sure I was there to pick at the point that as many berries on each bract were plump and juicy.

Fiber Dyed with Pokeweed


Most plants had bracts ready to pick starting in the early fall and right up to frost.
I had only one dyeing session with pokeweed berries, dyeing with the bath until the dyestuff was exhausted.  Numerous colors were obtained by over-dyeing other colors.

I harvested more bracts, however, for the freezer.  I don't know if I'll succeed but I'll try dyeing with the thawed berries sometime this winter.


Pokeweed is considered to be an invasive weed.  But, having gotten to know the plant better, I have an appreciation for the plant.  I allowed a couple of the plants to grow up at the edge of my garden and enjoyed the lovely shape that the plant becomes when it's not relegated to neglected weed patches.
Pokeweed

I almost missed the boat with goldenrod.  I had tried it a few years ago, getting the same predictable green/gold color that I associated with most plant dyes.  Not enthused about trying it again, I waited until the goldenrod flowers were few and far between before discovering that they can produce a lovely soft buttery yellow if used correctly.


Walnuts soaking in water
The walnut dyeing continued, and will continue.  I have several bags of walnuts slumbering away in my basement freezer, awaiting a mid winter dye day.  Here is the large jar in which I soak walnuts.  This photo was taken minutes after the walnuts were added to the water.  They are floating at the top, out of range.  The dyestuff is sinking downward from the nuts anc accumulating at the bottom of the jar.  In a short time the water will be black!


Speaking of walnut dyeing, I shot a quick video about what walnut trees and their fruits look like and how I harvest them when I was out in the pasture one day moving sheep.  Watch it here.


Finally, just last week, it was Shearing Day.  Here's Bud keeping an eye on all concerned.
Shearing Day


Click here to watch my shearer, Kevin Ford, at work while sheep and Border Collie watch.

Sunday, August 7, 2011

Summer, Swiftly...

It's just not been a summer for blogging.  I envy those who blog regularly, with beautiful and well-written posts.  I take photos and they languish.

But that doesn't mean the summer has been unblogworthy.  Here's a feeble attempt to catch up:

Natural Dyes Workshop with Sara Goodman

In mid July I spent three days with Sara Goodman, learning about using natural dye extracts for dyeing fiber.  This was one of the seminars offered through NEWS: New England Weavers Seminar.  I've kept quiet about it on this blog but using natural materials for dyeing has been on my mind this year.  When it comes to natural dyes I'm most interested in sustainability and focusing on materials that can be gathered locally.  This workshop involved using dye extracts from far away places... but I'm still glad I participated.

Samples from Sara Goodman's Natural Dye Workshop

Here are some of my projects from that workshop:
At twelve o'clock are some skeins of the first yarn that I had commercially-spun years ago; one dyed with walnut extract and one with a mixture of extracts.  Perhaps a shawl.

At three o'clock  is a skein of my sock yarn, originally dyed with a local plant material, then overdyed in the indigo vat that we learned all about.  I tried to allow some of the original color show through the indigo.

Center: dye samples on a silk strip.

At six to eight: a small pre-felt dyed in a mix of extracts.

The remainder: some of my lambswool yarn painted with a variety of colors for warp, along with a skein of the same yarn for weft.  Both were over-dyed in the indigo vat.  Enough for two scarves.

Would you like to see how yarn dyed in an indigo vat changes color as it is lifted out and exposed to oxygen?  Follow this link.

And here are my Pygora girls, up to no good.  Notice that when I called Tina's name at the beginning of the clip, she answered.

Finally, yarn destined for Meadow Muffins, dyed with alder cones, and two intensities of walnut.  Gathered from trees that are in or next to the pastures that my sheep graze.  Cafe au lait?

Meadow Muffin yarn, dyed with locally-gathered dye materials

Friday, July 1, 2011

A Pause...

During the last few months I've been reflecting on things and re-examining priorities.  Available time has been channeled into addressing the fact that a slow economy is turning my studio into a warehouse.  This can be ok up to a point.  When it gets hard to find things, there's no place to work on projects, and only narrow paths wind through equipment and wool, the situation is out of hand. 

I hadn't sold raw fleeces in years.  But since I have far too much clean, carded wool waiting to be dyed or sold as is,  I decided to sell the results of the last shearing at a very reasonable price in the Fleece Market forum on Ravelry.   Fleeces have been making their way to California, New Mexico, North Dakota, Pennsylvania, Virginia, Connecticut, and Canada.  I've also started listing roving in the same forum.  These listings will continue until I can move around a little in my studio!  I've added a page, listed on the sidebar of this blog, for photos of fiber that is for sale.  If you're interested and don't see the link it may be because you're reading this in Google Reader and haven't actually clicked through to this blog.  Click away!

It's not just a wool problem: I have more fiber equipment than I need.  So I'm looking with a critical eye at the equipment situation.  The Wolf Pup went to the home of a new weaver this week and The Big Wave will hopefully go to its new owner this weekend.  I'm trying to get to the point where my equipment better reflects the type of fiber work that I enjoy doing.  Not an easy goal for me!

I don't enjoy blogs that skimp on photos so it's time for one:

Japanese Indigo

I decided early this spring to dip try some dyeing with plant materials.  This is a small patch of Japanese Indigo, started from seed in my sunroom.  This month I'll be taking a three day workshop on the subject of natural dyeing at New England Weavers Seminar; indigo dyeing will one of the subjects covered in the workshop.

Finally, here's a farm shot of a few girls in my small kitchen flock.

Kitchen flock

And if you've stuck it out this far, you might enjoy a little video of my backyard chickens, produced a couple of weeks ago with my iPad:  Free-range chickens

Friday, May 13, 2011

WEBS Fleece Sale

Coopworth cross roving


It's tomorrow from 10:00 am until 5:00 pm.  I'll be there and I'm packing fiber now.

Saturday, April 30, 2011

Sojourner Design roving at WEBS

A couple of weeks ago I replenished the stock of Sojourner Design roving at WEBS.  It's always fun to stop by the store with a basket load of brand new colors... and even more fun to walk back out with an empty basket!  (If your plans involve a trip to WEBS, please look for my roving.)  But the MOST fun was visiting the WEBS Yarn Store Blog yesterday and seeing a photo of my roving along with a ball of yarn spun from it!

Chicken House on Wheels

Yesterday I captured an annual farm activity here:  my chickens' change of address from their winter  quarters to their summer house on wheels.  From now until sometime in October, they will lbe backyard nomads.  Every few days the house will be moved and the portable fencing will re-installed, providing them with fresh hunting grounds.  The house was built on an old trailer from wood framing and metal roofing, and can be hitched to my ATV.
After moving the chickens out, it was time to clean out a winter's worth of dust and debris.  It all got shoveled into the bucket of my husband's tractor and was deposited in our compost pit where it will mix with grass clippings, kitchen waste, etc.  This is very dusty work.

The photo is overexposed because the sun was streaming into the house... but it's clear that there was a need for cleaning!

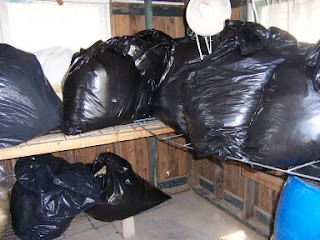
And here's why: the fleeces from the last shearing in late February had been temporarily stored in the barn basement.  It was time to get them into a more suitable storage space.  I choose to store my raw fleeces in plastic bags.  The bags are left open for ventilation and are placed on temporary shelves constructed from cattle panels (metal fence sections) to facilitate good air circulation.  They will now be steps from my basement door, enabling me to pull out a fleece and get it sorted and ready for processing whenever I have the time to do so.  By midsummer they will all be sorted, skirted, and ready to deliver to the fellows at Twist of Fate Spinnery for washing and carding.


This whole process of moving chickens out and fleeces in has developed a rhythm and is a spring ritual!

Monday, February 28, 2011

The Lucet: A New Favorite Tool

Lucet and braid created with Meadow Muffins light sport yarn

A lucet is a very old fiber tool that has been used for a thousand years to create braids for closures (remember: no zippers, no snaps, no hooks and eyes, no Velcro when the lucet was first used).  I'd been aware of it and it was on my list of things to try until my good friend Victoria taught me how to use one.  I'd tried to follow the written and video instructions on the web but really needed a live demo to learn it.  Then I was off and running!

The first lucet purchase was a failure: too small, too narrow, the surface was too rough, and the hole through which the braid passes was way too small.  My second lucet from Lynn the Weaver is just a joy.  Created from rosewood, it feels smooth and wonderful in my hand and is beautiful to look at.  Lynn answered my questions and shipped the lucet promptly; her prices are very reasonable.  She has other models as well as tutorials on her site.

A lucet and a small ball of yarn take up very little space so are quite portable.  The technique is easy and the process is the sort of activity that can be pulled out at any time to work unobtrusively.  Perfect for those times when all one can do is wait patiently.

Lucet braid and Meadow Muffins light sport yarn


Both  photos are of two strands of my Meadow Mufifins light sport yarn worked together.  I'm looking forward to moving on to combinations of various types of fibers.

There's a very quiet Yahoo list on the subject as well as a less quiet group on Ravelry.  It's worth a try!

Monday, February 21, 2011

Just a Little More Embroidery on Felt

Prefelt, embroidered


This was a circle of prefelt that I had sort of spatter-dyed with multiple colors.  At first I tried stitches that encircled various areas of color but didn't care for the effect.  I decided to superimpose a stitch pattern over the dye pattern (I love the concept of one pattern over another) and like the effects much more.  My stitches followed wavy paths; the waves are a little hard to detect but I like it anyway.  The stitch pattern would have shown up better if I'd used a backstitch instead of a running stitch.  I also wish I had fulled this piece of prefelt before stitching.  It's too spongey.  But I do love the texture!

Sunday, February 13, 2011

Felt Julehjerte Valentine

Felt Julehjerte Valentine


It is a custom in Denmark and Northern Germany for families to weave paper hearts together to create lovely Christmas ornaments.  Although I always think felt when I see a paper project that appeals, I have to admit that I was inspired to try one when I saw Jennifer Ackerman- Haywood's tutorial for creating Julehjerte valentine baskets on her CraftSanity blog.  Jennifer's and my hearts are simple; she crafts with her children and perhaps I'm stuck in my felting days as a child.  The felt used if from my own sheep, of course.  But depending how the hearts are cut the weaving can be quite exquisite when paper is used.  Happy Valentine's Day to my blog friends!  

Sunday, January 30, 2011

Weaving With Felt

Weaving with Felt

Just a quick look at a project I'm working on, weaving with felt strips and vintage rayon fabric gleaned from thrift shop finds.  This project will take time; I'll post more photos of little details here and there as I progress.

Friday, January 28, 2011

Fantastic Felt Fulling Flop

A Basket of Flop


Actually, it was a prefelt fulling flop.  But I just love alliteration. I was hoping to full one of my prefelts in preparation for a project I want to undertake as a participant in Jude Hill's Contemporary Woven Boro online class.  I ran it through a full cycle in the washer.  I knew this prefelt was a little iffy because its route to the machine needlefelter at my processor was a bit circuitous.  I won't go into details here because this experience will be described in a prefelt fulling tutorial that I plan to write and post soon.

Here it is all spread out in its glory
Actually, I like it.  It fascinates me and I think there are little areas that will find their way into some project(s) eventually.

I didn't get a shot of this fiber before fulling, but here' s an identical piece un-fulled.

Prefelt, Pre-flop

And, by the way, here's one of my regular prefelts which has been fulled in the washer and is ready for my class project.

Fulled Prefelt

Tuesday, January 18, 2011

Socks from Sojourner Design Yarn


My local customer who enjoys knitting with Meadow Muffins yarn has been at it again!  This time she used a more subtle combination of hues.  Just in case you haven't seen them, here's the shot of her first pair of socks with this yarn.


I'm hoping to see more work from this gal!  Also, notice the backgrounds.  The first socks were finished early last summer and laid out on lovely green grass.  The new socks ... done in December and resting on pristine Northampton snow.

Speaking of snow, here's a view of my sheep pressing in around the winter haylage feeder this morning as the snow was falling.


I've refreshed the Home Page of my website with a couple of photos taken this morning.  In fact, you'll find a number of changes and additions (such as the Prefelt page) there.  Here's one of the photos I added to that page:


I've added a few listings for carded wool to my Zibbet Shop... now I just need to figure out how to make all those Meadow Muffin hues available online!

Friday, January 7, 2011

SojournerDesign at Zibbet.com

 Zibbet?  Zibbet?  What's that?  I didn't know myself until recently.  I stumbled upon Zibbet.com when I had googled something or other and there I found a link to someone's shop on Zibbet carrying the item I was searching for.  I liked that.

Many fiber and handmade enthusiasts know about and use Etsy.  As an Etsy shop owner, I find the place very crowded.  And adding a listing to one's shop on Etsy really tried one's patience.  This is the year that I have to increase my presence on the web, so welcome to my Zibbet shop.

If you're reading this post in Google Reader, you're not seeing the button at the upper left hand side of my blog page for accessing my Zibbet shop because Google Reader cuts out all the stuff that appears along the sides of blogs.  So here's a button right in this post, just for you:


So far there's just one listing there.  But if you'd like to stock up on Angelina, hurry on over.

Zibbet.  Zippit.  Zibbet.  Ribbit.  Zibbet...