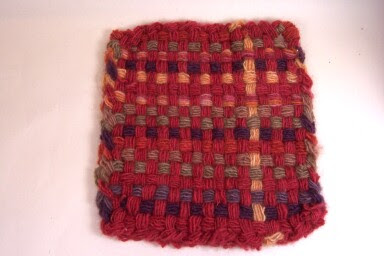
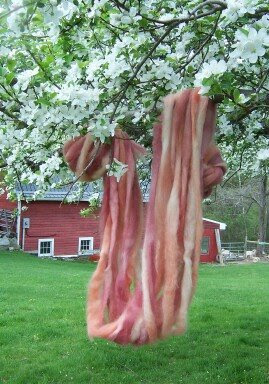
Wednesday, December 9, 2009
Gathering In
The grazing season has ended. I had hoped to bring the sheep home for the winter in four days or so; but with seven inches of snow, turning to rain and then cold temperatures moving in, Bill and I decided it was time. The electrified, portable net fencing that protects the sheep all summer is very fragile in cold weather. I didn't want it to freeze into the snow and ice. In addition, snowmobiles traverse the area frequently and I didn't want to stand the chance that they might run into the fencing. So Bud and I went out into the sleet to do what we had to do.
Bud has been a bit of a yahoo with the sheep lately. Taking off like a streak of lightning after the sheep, and not responding when I called "Down!" the command that basically means "cool your jets."
Today he accomplished his task with finesse. When I said "down" he lay down. When I said "walk up" he approached the sheep slowly so that he didn't create panic. By edging into the zone of discomfort for the sheep he directed them where they needed to go. When one sheep separated herself from the flock and I said "look back," he realized that he needed to return and bring that sheep back into the group. I was proud, and Bud was praised profusely. Once in awhile things go smoothly.
Having moved the sheep into the pasture adjacent to the barn, Bud was told "That will do," and he settled down to monitor his flock while I climbed all over the hill, retrieving fence. I think I'll keep him.
Saturday, December 5, 2009
Loom for Sale SOLD
SOLD
After a long, long, long period of indecision, I am offering my beautiful cherry Norwood loom for sale. Norwood looms are no longer built with cherry wood. This loom has a 40 inch weaving width, has eight shafts and ten treadles. The back beam is a sectional beam. Don't be put off by the sectional loom; if you're not interested in sectional warping it's easy enough to warp in the usual fashion. It comes with a matching Norwood cherry bench. The seat flips up for storage and there is a storage bin on each side of the bench. This gently-used loom is a great buy at $1500; I just want to pass it along to another weaver while I focus more closely on what I want to do with my weaving.
Sunday, November 29, 2009
That's My Girl!
Since before birth, my daughter Amanda has been a lover of music. In the few short years since college she has accomplished so much in her career. Please click here for a link to this article. My favorite part of the article, of which I'm most proud, is the last paragraph.
Wednesday, November 25, 2009
Going Baaaaaa-less
Well, not really. What I mean is that I haven't been weaving with wool lately. That's just a temporary situation while I get some wool rug warp dyed up and ready for rugs.
In this case, not even natural fiber!!!!!
I wanted a small rug to put in front of the sink in the upstairs bath. (That would be the bath that casual guests don't see so I went a little over the edge when I painted it. Note the outlet plate too.)
Anyway, I wanted something that would wash and dry quickly so I decided on a rag rug woven with strips of acrylic and polyester. My sources were thrift store finds and a couple of chenille throws that were deeply- discounted last spring.
The colors are a bit much... just right for that room!
I think I'm so used to dyeing multiple shades of several hues and then combining them so these clear tones in the rug are a little jarring to me.
My design was also limited by the colors that I had in the fabrics I needed. As it is I made a quick trip to two shops in town looking for acrylic sweatshirts in the right colors.
I needed to replace my ratty, faded crocheted dishcloths and wanted cloths that I could enjoy using. I put a 7 inch or so wide warp of mixed cottons on my workshop loom and wove up half a dozen cloths. The finished size is small but so are my hands and I find them more manageable than the store-bought ones.
Except for the sheep photo, the rest of these photos should take you to a larger image if you click on them. Should I provide links to larger images of the critters too in the future?
Hope everyone has a restful... and grateful... Thanksgiving.
Thursday, October 29, 2009
The Last Batch of Potholders for Now
Here I used the same overall technique for these two but wanted them to coordinate since I'd be donating them to a local Senior Center for their Christmas fair. I started experimenting with design. This is a fun way to learn about color and proportion because the projects are small and don't involve a great investment of time or fiber.
For instance, I decided that the contrasting yellow is more effective when placed closer together as opposed to alternating.
There's still room for improvement- particularly, the hanging loops- but I was satisfied enough with these to donate them. The others will reside in my kitchen where my poor tired 30-year old potholders will be retired.
Tuesday, October 27, 2009
More Potholders
With the fourth and fifth potholders I started getting a little smarter. I decided to make my own "loopers" by wrapping strands of my wool yarn from one peg to the opposite peg four times and then tying off with a square knot. I found it easiest to do this on pegs that were near the corners as there is more space for fingers there.
Then I removed the looper and placed it on the loom where needed. So I created loopers as I wove, designing the color patterns along the way. I kept the knots in the middle of the fabric instead of the edges and used a crochet hook to work them into the weave; this helped keep the edges neater.
The number of passes around the pegs in creating each looper really depends on the thickness and "squishiness" of the yarn and it's a trial-and-error process.
I wanted my loopers, once they had taken a trip through the washer with hot water, detergent and a full wash cycle, then tumble-dried at the hottest setting, to "full" nicely; in other words, I wanted the yarn to fluff out into the spaces between loopers and to also be thick enough to be safe when handling hot items in the kitchen.
At this point it takes me about an hour to make each potholder. I'm slow at everything I do so it could take less time for manly people. It's very enjoyable to do while watching football games, etc.
More later!
Monday, October 26, 2009
Way Too Long...
Back after an extremely long break. I've been focusing on other areas of my life over the past few months, starting a small part-time business within my nursing career and also re-thinking what direction I want to take my fiber business in. More about that later... for now I want to start sharing some of the work I've been doing.
I recently bought a potholder loom from Jennifer at CraftSanity. I'm a longtime listener to her Podcasts and have learned so much from them. She interviews various artists, many of them textile artists, in depth, asking many probing questions to help the listener understand how the artist evolved to her present level.
Back to the loom! Jennifer has started producing beautiful, meticulously-worked wooden looms in various sizes. The concept is similar to the old potholder looms we used as children; it is so much nicer using equipment like this! Loom dimensions available run from coaster size up to place mat size. Jennifer mentioned a loom large enough for producing small rugs but I haven't seen one yet. I purchased the large potholder size because I wanted to make wool potholders that could go in the washing machine so I needed to plan on shrinkage. That size is working very well for me. I think that the prices of these looms are quite reasonable for the quality of the workmanship; if you'd like a look, head over to her Etsy Shop.
The photo above shows the large potholder loom with my first potholders. On one on the left was made from loopers that I cut from old tee shirts. OK, quite similar to the ones children produce, but too bulky to be functional and I didn't care for the somewhat sloppy edges. On the lower right I tried some three and four ply yarn that I had put together from hand-dyed wool singles spun from local sheep. The colors are nice and it's a pretty cloth, but again not functional because even after a trip through the washer the fabric is too thin with too much open space to use safely. I can't remember exactly how I made the third one (upper right), but it involved using multiple strands of single ply, same yarn. Getting closer to my desired effect but still too thin. I'll be back later with more.
Saturday, May 2, 2009
More Photos Than Words ... well, almost.
View from the bathroom:
View from the kitchen sink:
On assignment in the neighbors' back yard:
Helena would be so embarrassed if she knew I'd caught her with her eyes closed.
A couple of the youngest members:
Love the coloring on these two; notice the knees.
FOR SALE
My latest Mary Alice roving (see a description of this method in my 04-20-09 post): hues of cantaloupe and watermelon with a bit of mink. One bag weighing in at 14.4 ounces; one slightly different in coloring at 8.4 ounces. $3.50 per ounce. These will go to the Fleece sale at WEBS in a couple of weeks; if you like it for yourself, just e-mail me.
Monday, April 27, 2009
Makes Me Smile
A little off subject, but take a quick look at today's post in Helen Suzanne's Hebart Journal.
Saturday, April 25, 2009
Monday, April 20, 2009
A Weekend of Ragweaving!
This was one of those stellar weekends. I hear that the weather was superb; I was stuck indoors at WEBS here in Northampton all day both days and didn't mind one bit. I was participating in a workshop with Johanna Erickson (author of Rag Weaving Gimmicks and Tricks) on the subject of Wearable Rags. We spent the whole weekend weaving up samples using several techniques and multiple materials. Rather than yarn for weft we used strips of materials.
This appeals to me as I have stockpiled old items of clothing for several years with the intent of doing some ragweaving. I also think that much of what I learned will apply to weaving with wool roving.
Here's a closer look at my samples:
This one included a quilted floral fabric like one would use to make a bedspread, then some pink knit fabric woven three different ways, then some shiny purple synthetic material interspersed with a weft here and there of multicolor; a large knitting needle was used to create the clusters of loops with the purple fabric.
The sample below was woven with a rather dense chenille warp. I experimented with wefts of batik-like cloth, seam binding, ribbons, rick-rack (the yellow stuff), and some brightly-striped fabric that had been pre-cut and supplied on a spool. I would have chosen a less-dense warp to allow more of the weft to show.
This piece involved weaving with strips of knit fabric such as tee shirts. It was particularly fun to weave with the blue and white-striped material, fiddling with each weft to create a checkerboard effect.
This was probably the most fun: picture weaving. A fabric with a design such as flowers is chosen, cut into strips, and the strips woven in order so that there is a squashed-down version of the images on the original fabric. The larger and simpler the images, the more the more similar the woven results will be. Here you can see I experimented with several different patterns.
I love attending workshops that involve creating samples rather than a finished item. Good food, good people, good weaving.
THOSE COMMENTS...
Thank you Michelle Ward, Sharon Bogon, and Tammy for your recent comments.
FIBER FOR SALE
These were two very successful and rewarding dye jobs in which I tried a new technique. In each bag there are several continuous strands of roving, each dyed a hue that is harmonious with the others. Because the colors are in separate strands the spinner can control exactly how the colors are worked up; either blended all together, spun intermittently, or even spun into separate colored skeins. The batch above includes strands ranging from a pale, polite yellow through several shades of green to aqua.
My friend Mary Alice bought a bag at the recent meeting of the Nutmeg Spinners Guild. When I saw her a few days later she told me how delighted she was when she looked closer at home and discovered that she would have so many spinning possibilities. So I've decided to call this dyeing technique my Mary Alice roving. It was nice to get good feedback from someone who appreciated my efforts to put more control into the spinner's hands.
Since Mary Alice asked me to set aside another bag of this, I only have one bag available now; it's 6.6 ounces of Finn Cross for $23.10.
More Mary Alice roving here, with shades of shrimp from pale to medium as well as a touch of pale mauve. I have four bags of this, each approximately one half pound; if you're interested I'll get you the specifics. Priced as above, at $3.50 per ounce.
I'm getting ready for my next selling event which will be the Fleece Market at the WEBS Tent Sale on Saturday, 16 May at WEBS here in Northampton MA. Although the main sale is a two-day event, the Fleece Market will be limited to Saturday. I have a new (to me) EZ-UP shelter which will hopefully function better than my shelter last year which blew down. My border collie Bud will be with me that day to welcome visitors.
Monday, April 6, 2009
Fiber for Sale
I've been quite the slacker when it comes to posting fiber for sale and am going to try to be a little better about that. This is a dye project with which I was very pleased. It's the roving that Spike showed you in my entry on 21 March.
Spinners at the Nutmeg Spinning Guild were pleased too; more than half of the dye lot sold there this past weekend. The color of this Border Leicester cross roving can best be described as smoky opal; the hue reminds me of the lichen that grows on rocks with shadowy areas within that hue. The shadowing is consistently inconsistent; if your project calls for consistency you'll need to take this into account in your spinning. I have a total of 20 ounces available, and it's listed on Etsy so you can purchase it there.
Kreative Blogger Award
I've been nominated by Janet Austin, a tapestry weaver in Rhode Island, to receive a Kreative Blogger award. Janet's blog can be found here: Tangled Web. I am honored to be nominated, particularly to be nominated by Janet. Receiving this award includes the following duties:
1. Copy the Kreativ Blogger Award to your blog
2. Put a link to the person from whom you received the award
3. Nominate 8 other blogs and
4. Link to them
5. Leave a message on the blogs you nominated
Guess this will be the start of a list of my favorite blogs appearing over there on the right. There are plenty to choose from; I read blogs through Google Reader and subscribe to and receive updates from 147 of them! Each week I add far more than I drop. I think this might be a little problem.
Here are the blogs I selected to pass the Kreative Blogger Award on to, and why:
Craftcast: because it's the blog for show notes from Allison Lee's super podcast by the same name. I enjoy the podcast more, but it's nice to have a place to go to pick up links from the podcast. Allison's interview technique and podcast design are so enjoyable. Hers is probably among my two or three favorite podcasts.
Cre8it Art Blog: because Jessica has introduced me to so many materials and techniques, both through the blog and through her great online classes.
daisy yellow. Can't read this one too late in the day as it will keep me awake. This one is a recent discovery and is indispensable to me. I love the way she cross-references her technique-laden blog entries.
Getting Stitched on the Farm: Just about the first blog I read when I see there's a fresh entry. The author of Kristin Knits shares her farm and creative lives.
GPP Street Team: lots of technique and challenges from Michelle Ward.
Magstitch: Maggie Grey, author of several on-the-edge books represents how the UK is so far ahead of us, if there can indeed be an ahead. But how I enjoy eating the dust!
Pin Tangle: Australian embroiderer Sharon Bogon is a talented artist who is so generous with her knowledge. She has inspired me, taught me in several online classes, and regularly reviews other blogs that I might enjoy.
Textile Tales: Carol McFee loads her blog with photos of sumptuous little pieces of textile art.
Saturday, March 21, 2009
Something's Different...
This is Spike, my Silky Terrier, showing you some freshly-dyed roving destined to be barely spun into thick rag-like dreds and then woven into a rug. The colors I'm dyeing for this project are celadon (above), periwinkle, and a touch of yellow here and there. This rug is destined for a recently re-decorated guest bedroom; my goal is t eventually have almost every rug in the house handwoven. I'm so happy with this soft green-gray hue that as I write this blog entry I have two pounds of it in the dyepot to sell this spring.
An anonymous commenter asked me if Angelina can be wet-felted among the layers of wool when felting a table runner. Angelina can be incorporated into wet felting, but I would take care to be sure that it isn't buried so deep that it can't be seen. You could take a small amount of your wool and card some Angelina into that, then use it on the top layer. If you do this, you probably need to be using a wool that really felts easily such as merino wool. If you're reading this and have no idea what I'm talking about, read about Angelina here. I sell Angelina in my Etsy shop; that link is in the column on the right.
Here's another little stitchlet comleted one evening this week. I'd been thinking about incorporating beads into my felt embroidery, but decided to make my own! This bead was constructed of several layers of cardstock glued together and painted with acrylic paints and a touch of gold lumiere paint. I opted to use some card stock that had a little printing on it for a collage effect. A great use for old Christmas cards!
I've added a group of these felt vest blanks to my Etsy shop at a very reduced price because I want to clear out my inventory and make some room. Click on my Etsy link over on the right to get there!
So... why is this blog entry labeled "Something's Different? Take a look, below. Comments? Anyone?
Friday, March 6, 2009
More Color
Last weekend I attended SPA Knit and Spin VII. This was my fifth year there; the event is described as a "Gathering of fiber art friends from across New England." The weekend involves several hundred fiber enthusiasts who commandeer two hotels in Freeport ME and just have a good old time pursuing their interest, socializing, eating and shopping. I usually go with three friends; we arrived Thursday so that we could extend our little vacation. I worked on more felt embroidery, above.
Upon my return home from SPA, I was thinking red. Monday was a snowy day so the dye pot was fired up.
So Tuesday I decided to even things up with Green. Forty skeins altogether! These will be reappearing soon on this blog.
Upon my return home from SPA, I was thinking red. Monday was a snowy day so the dye pot was fired up.
So Tuesday I decided to even things up with Green. Forty skeins altogether! These will be reappearing soon on this blog.
Thursday, February 12, 2009
At Peace
Thank you to those who have passed along kind thoughts. My mother slipped away peacefully yesterday morning. My father was at the bedside, holding her hand as she left. I'll be taking a few more days off from blogging during this sweet, sad time.
A Parable of Immortality
Sunday, February 8, 2009
A Little Silence Here...
To my Blog Friends,
It will probably be a little while before I post again because my mother, who has been in failing health, has taken quite a downturn. I suspect that the next week or so will be a tough one and that I won't have too much online time. I'll be back soon though!
Saturday, January 31, 2009
More Stitching...
I imagine Sharon B will be moving on to a new embroidery stitch in the Stitch Explorer challenge, but just had to have another go at Chicken Scratch. I really enjoy this concept and see so many possibilities with it! This one involves small squares of multi color gingham lightly fused to a piece of my hand-dyed felt in a checkerboard pattern as a base for stitching, again with my own yarn.
THOSE COMMENTS...
Thank you Kristin Nicholas for stopping by my blog! Hope all is continuing to go well with lambing; I loved that last photo you posted!
Sharon, thank you for admiring my first piece I did for Stitch Explorer. Hope you stop back and see today's!
Now I'm off to feed some sheep.
Sunday, January 25, 2009
FarmNewsFlash
Kristin Nicholas has posted a beautiful short video of one of her sheep giving birth and caring for its new lamb. This would be a great video to watch with children.
THOSE COMMENTS...
Barbara G, thank you for the feedback. I missed seeing your new work at our last meeting!
THOSE COMMENTS...
Barbara G, thank you for the feedback. I missed seeing your new work at our last meeting!
A Little Thief...
A couple days ago I checked in on my chickens just after lunchtime. This is what I saw: an opossum had found his way into the house, taken the top off the kitty litter pan I use as an egg box, had himself a tasty egg dinner, and snuggled in among broken eggshells for a nice nap. When I first saw him he was sound asleep in a ball. I was unable to capture that because I had to run back into the house for my camera.
Ever so slowly, he shook off his somnolence. He knew he was in an awkward situation and stayed curled up with his pointed snout open, showing some rather sharp-looking teeth. Most of the chickens were outside in their fenced-in area, but there were one or two walking around inside, unconcerned. There were a few eggs laid in the bedding in another corner of the coop so I'm assuming this fellow had been in possession of the egg box for awhile.
I don't want him to be a regular visitor so using a t-post I tipped him out of the box. He scurried out through the small chicken door, cowered in one corner of the outdoor pen, and eventually found a way out to freedom. He may have been helping himself to eggs all along but got sloppy in his burglary by snoozing on the job. I'll have to keep an eye on the situation and make some changes in the fencing if I see him again.
Time to show one of my projects from last summer. This is a ruglet, a small prototype for a rug. I tend to embark on rather labor-intensive projects so I like to do small samples and then make a decision about whether I want to invest the time on a larger version, or whether my idea would even work.
This ruglet was woven on my big Swedish loom on a cotton warp using several hues of hand-dyed wool roving. I didn't want the warp to show so laying in enough roving weft to cover the warp yarn was quite fiddly. If I were weaving a rug I'd probably use a nice dyed wool warp and not worry about whether the weft covered it completely. I'm also not sure about how this would function as a rug. I wouldn't want to put it in a high traffic area; it might be quite nice though as a scatter rug next to a bed.
Tuesday, January 20, 2009
I Digress... Often.
I am, to a fault, a divergent thinker and a curious person. I'm always up for learning about, or at least admiring, a new artistic medium. The problem is that I often allow myself to be lured into trying my hand at these new adventures. I've finally decided that it's a good thing, something that I shouldn't try to reign in for now, but it definitely results in being spread a little thin.
Here's an example. I'm currently enrolled in a fantastic online course, Paper Quilting Explorations, with Terri Stegmiller. I'm not a quilter and clearly wool is my thing. The class is time-intensive (as evidenced by my lack of blogs over the past few days), but so worthwhile. I'm putting materials I'd purchased and stored away and learning about the characteristics of various surface design products.
This piece involved gluing white tissue paper to muslin after crumpling it up then smoothing it back out, spraying three hues of Adirondack Color Wash (I used hues close to the primaries I use for dyeing) and then spreading the dyes around on the surface. After drying I added a little gold Lumiere paint to bring in a little light, cut the sheet into six squares and darkened the edges with a black stamp pad that was almost dried out (oh well).
For the background I chose some sheet music that my mother-in-law had used as a young girl and glued it to muslin. The background was fused to Pellon. The squares were fussed to the background in a pleasing arrangement. Finally, a little machine stitching around the squares and the edges of the background were machine zig-zagged. I like it enough to hang it and will probably be matting it on a canvas, although I'm open for suggestions. I've added a close-up below.
THOSE COMMENTS...
JaneO, thank you the positive feedback on my chicken scratch embroidery. I took a look at the work you’re doing as a City and Guilds student, and it looks intense! I’ve been subscribing to your blog for awhile. City and Guilds, for anyone that’s not familiar with this, is an educational program leading to a diploma in stitched textiles.. At one time the program was supported by the British government! JaneO, if anything I said here was inaccurate or if you’d like to say more, please come back and leave another comment.
Helen, thank you for your compliment on the chicken scratch embroidery. Helen, also located in England, maintains a blog. It’s worth a click to check it out; scroll down a little to 11 August 2008 for a hilarious post on stash busting!
Thank you, Elizabeth, for your comments. I love the texture too- that’s one of the reasons I love working with felt. I realized that I had made a mistake in my description of the work. The lighter brown squares are couched, not appliquéd. Elizabeth has a great blog, Quieter Moments, in which she’s documenting her embroidery work.
Thursday, January 15, 2009
Stitch Explorer
I'm participating in the Stitch Explorer challenge over on Sharon Bogan's blog, Pin Tangle. Each month Sharon will be posting information about an unusual stitch or style of embroidery. She provides guidance and links to other sources of information about the stitch. Sharon challenges participants to try the technique, modifying it with their own ideas.
This month's challenge is "Chicken Scratch," described as a combination of simple cross stitches and a lacing technique. As always I'm partial to wool yarn on felt (from my sheep of course). Chicken Scratch is often worked on gingham; I chose work my own version of gingham by couching contrasting squares onto the background with the embroidery stitches themselves. I'm pleased with my sample (6 x 6); the photo doesn't really capture the texture. Lots of fun, so many possible variations!
Temperatures are predicted to be below zero in the morning, without taking wind chill into consideration. We're ready!
THOSE COMMENTS...
Thanks for stopping by, Elis. Her great blog, Into the Blystic, documents every few days another of her abstract paintings. I really enjoy seeing them, and lately she has started commenting on her technique. I think that enjoying another art medium helps me to be more creative in my own.
Subscribe to:
Posts (Atom)